Heat treating tool steel improves its performance. By changing the steel’s physical and chemical properties,it becomes tougher, harder, and more resistant to wear. Have you ever wondered why some tools last longer or perform better under stress? Heat treatment makes that happen. The key is getting it right, and small mistakes in the process can make a big difference. Let’s explore how.

Introduction to Heat Treating Tool Steel
Heat Treating Tool Steel
Heat steel to target temp.Hold temp for fixed time.Cool at precise speed. These steps increase the steel’s hardness, toughness, wear resistance, and overall mechanical strength, making it more suitable for demanding tasks.
Key Heat Treating Steps for Tool Steel
| Heat Treating Step | Tool Steel Type | Temperature Details | Time Details | Cooling Details |
|---|---|---|---|---|
| Annealing | A2 tool steel | Heat to 1550°F (843°C) | Soak for two hours | Slow cool at 50°F (10°C) per hour below 1200°F (649°C) |
| Hardening | O1 tool steel | Heat to austenitizing temperature (1450 – 1500°F or 788 – 816°C) | – | Quench rapidly in oil |
| Tempering | Most tools, Cutting tools |
Heat to 400 – 450°F (204 – 232°C) Heat to 300 – 375°F (149 – 191°C) |
Tool steels are usually supplied in an annealed state, with a hardness of 200-250 Brinell (around 20 HRC) to make machining easier. After heat treatment, the steel’s soft matrix turns into a hard one that can withstand high pressure, abrasion, and impact during metal forming.
The way to get the best performance
Preheating

Preheating is a key step in heat treating tool steels. It helps reduce thermal shock, prevent distortion, and ensure even heating throughout the material. The typical preheating temperature range is 1200-1500°F (650-815°C), depending on the type of tool steel.
Preheating Temperatures for Different Tool Steels
| Tool Steel Type | Preheating Temperature Range |
|---|---|
| O1 Tool Steel | 1200-1300°F (650-705°C) |
| A2 Tool Steel | 1200-1400°F (650-760°C) |
| D2 Tool Steel | 1350-1450°F (730-790°C) |
| H13 Tool Steel | 1500-1600°F (815-870°C) |
Preheating Time and Thickness Considerations
Preheating times range from 30 minutes to 2 hours, depending on the thickness of the steel. A general rule is to allow 1 hour per inch of thickness.
Heating Rate and Process
It’s important to control the heating rate during preheating. The rate should not exceed 400°F (222°C) per hour to avoid thermal gradients that could cause distortion.
Double Preheat Process for Complex Tools
For larger or more complex tools, a double preheat process ensures better heat distribution: 1. First Preheat: 1200-1300°F (650-705°C) 2. Second Preheat: 1500-1600°F (815-870°C).Preheating can reduce internal stresses by up to 90% compared to directly heating the steel to austenitizing temperatures.
Austenitizing
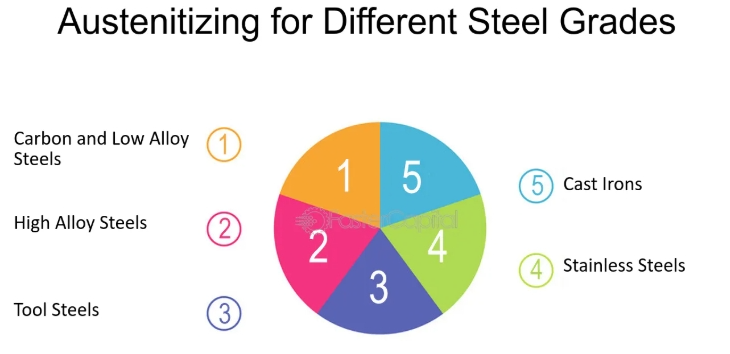
Austenitizing is like waking up steel, giving it new strength. When we heat it to the right temperature, it changes, becoming a stronger form. This transformation is crucial. It prepares the steel for the next step, where it will be hardened to its full strength.
Austenitizing Temperatures and Hold Times
The temperature and time spent at this temperature depend on the specific grade of tool steel:
| Tool Steel Type | Temperature Range | Hold Time |
|---|---|---|
| O1 Tool Steel | 788-816°C (1450-1500°F) | 10-30 minutes |
| A2 Tool Steel | 954-1010°C (1750-1850°F) | 30-60 minutes |
| D2 Tool Steel | 980-1030°C (1800-1890°F) | 30-45 minutes |
| H13 Hot Work Tool Steel | 995-1040°C (1825-1900°F) | 30-45 minutes |
Key Factors Affecting Austenitizing
Higher temperatures help more alloy elements dissolve into the austenite structure, increasing hardness but also increasing the risk of grain growth. Longer hold times allow carbides to dissolve fully, but they may cause the grains to grow.
A finer initial grain size requires either higher temperatures or longer times to fully transform into austenite.
Typical Effects of Austenitizing Temperature on Properties
Lower temperatures improve toughness but result in a slightly lower hardness.
Higher temperatures increase wear resistance and hardness, but reduce toughness.
Austenitizing Atmosphere Considerations
Vacuum or Protective Atmospheres.These help prevent decarburization and oxidation during heating. Argon or nitrogen atmospheres are commonly used.
Salt baths heat the steel quickly and evenly while protecting the surface.
Grain Size Control
A finer austenite grain size improves toughness. Elements like vanadium and niobium form fine carbides that prevent grain growth during austenitizing, ensuring better performance.
Proper austenitizing is essential for getting the best results in tool steel, laying the groundwork for optimal performance after quenching and tempering.
Quenching
Quenching is a vital step in heat treating tool steel. It quickly cools the steel from the austenitizing temperature to set the desired hardness. The cooling rate plays a key role in the quenching process, and the choice of quenching medium directly impacts the steel’s final properties.
Quenching Media and Their Characteristics
| Quenching Medium | Cooldown Feature | Cooling Rate at 300°C | Suitable Steel Types |
|---|---|---|---|
| Water | Fast cooling rate, ideal for low – alloy steels | 2700°C/s | Low – alloy steels |
| Brine | A 10% salt solution, cools faster than water | 5000°C/s | – |
| Oil | Slower cooling than water, reducing cracking risks | 1200°C/s | – |
| Polymer Solutions | Offers adjustable cooling rates between water and oil, giving flexibility | – | – |
| Air | Slowest cooling rate, usually used for air – hardening steels | – | Air – hardening steels |
Quenching Severity
The severity of the quench is determined by how fast the steel cools. This affects both the hardness and cracking risks:
Most severe to least severe: Caustics > Brine > Water > Polymer > Oil > Salt > Gas.
Carbon Content and Quenchability
Steels with >0.3% carbon: Not suitable for water quenching due to a higher risk of cracking.
Steels with <0.3% carbon: Ideal for water quenching, as they are less likely to crack.
Quenching Process Steps
- Heat the steel to the austenitizing temperature.
- Hold the steel at that temperature for the right amount of time.
- Quickly transfer the steel to the quenching medium.
- Stir the steel in the quenching medium to avoid steam bubbles.
- Continue cooling until the steel reaches a safe handling temperature (around 125°F).
Interrupted Quenching
Some air-hardening tool steels may undergo interrupted quenching. This means quenching the steel in oil until the surface turns black, then letting it air cool to finish the hardening process.
Vacuum Heat Treatment
Vacuum heat treatment creates a protective shield for steel. Inert gases quench the material, helping it cool evenly and preventing contamination.
If you’re working with larger steel sections, you may need a high-capacity pressure pump. This will give the process extra power to handle the added load.
The goal is to keep the tool steel in perfect condition, no matter how big the job is.
Tempering
Tempering is like giving steel a break after a tough workout. When tool steels are hardened, they’re like athletes after a hard match—stressed, brittle, and ready to crack. By reheating the steel, I can change these tense areas into a balanced state, turning them into tempered martensite. This releases the internal stress and improves toughness, making the steel stronger and more resilient. It’s about finding the right balance between strength and flexibility, ensuring the tool is ready to perform at its best when you need it.
Key Tempering Parameters
Temperature range: 150-650°C, depending on the tool steel grade and properties required.
Holding time: 1 hour per inch of thickness, with at least 2 hours minimum.
Number of cycles: 1-3 tempering cycles, more cycles are needed for highly alloyed steels.
Cooling: Air cool to room temperature between tempers.
Tempering Temperatures for Common Tool Steels
| Steel Type | Tempering Temperature Range |
|---|---|
| Tool steels | 200-300°C |
| Spring steels | 300-400°C |
| Structural steels | 450-650°C |
Tempering Color Guide
| Tempering Color | Temperature | Applications |
|---|---|---|
| Light yellow | 210°C | Knives, razors |
| Straw | 220°C | Rock drills, reamers |
| Yellow | 230°C | Scribers, planer blades |
| Purple | 260°C | Taps, surgical tools |
| Dark blue | 290°C | Screwdrivers, wrenches |
| Light blue | 310°C | Springs, gears |
Important Considerations
(1)Use the highest tempering temperature that still maintains the needed hardness.
(2)Ensure the steel is cooled to room temperature between tempers.
(3)Temper immediately after quenching to prevent cracking.
For O1 tool steel, temper at 400-450°F for most applications or 300-375°F for cutting tools.
Effects of Tempering
| Aspect | Effect of Tempering |
|---|---|
| Hardness and Strength | Reduces hardness and strength |
| Ductility and Toughness | Increases ductility and toughness |
| Internal Stresses | Relieves internal stresses |
| Dimensional Stability | Improves dimensional stability |
| Wear Resistance | Enhances wear resistance |
summary

Understanding and applying the right heat treating processes can unlock the full potential of tool steel. This improves its strength, durability, and performance in demanding tasks. Every step matters, from preheating to tempering. How precisely we handle these stages makes a big difference. I recommend using heat treatment to take your tools to the next level!